Saturday, 17 December 2016

The Sheath Dress, by The Avid Seamstress

Greetings Stitchers. Today, I want to share with you a very wearable toile.


This, as the title says, is the sheath dress by The Avid Seamstress. It looks similar in style to Tilly and the Buttons's Bettine dress.  At first I wasn't desperately drawn to it, until I saw it on Josie aka The Fabric Godmother, and then I thought... I NEED that dress!

Bettine
The sheath dress

The pattern envelope says it needs 2.5 metres of fabric; this was a stumbling block, as I didn't have anything appropriate in that length. Luckily, wise counsel from sewists advised: "trace it out, and I bet it doesn't need that much".  And indeed they were right! I got this out of 1.5 metres, though I did shorten the pattern piece, as I am tiny (5ft, FYI) in height. The sleeves are one piece with the bodice, kimono style; it creates a bat-wing effect and drape under the arm.

Excuse odd facial expressions, but this pic shows the almost bat-wing sleeve shape.

I wanted to make a toile to check out the fit/shape/feel of this dress. Clearly I have chosen not to include the waist elastic, but I may do in the future: I love the silhouette anyway. The toile feels comfy and looks stylish.  I feel this dress is crying out for a big broach or colourful necklace to make it sing (so I am hoping for the perfect big necklace for Christmas!).


The pattern includes in-seam pockets, but I chose to remove them from this version as they were distorting the side seams. Perhaps I did them wrong?  I will try again on my next version as they would be good to have. I also ballsed up the hem.  I always stabilise the hem before sewing with knit tape and always have great results. With this make, I couldn't find the tape, but carried on regardless. Wavy hems ahoy - lesson learnt.
Think I need a sway back adjustment here to get rid of pooling fabric.
I left out the back zip, as the dress is roomy and the neckline big enough that it's not needed. I love the feel of this dress, classy but also cosy.  To amp up the comfort factor, I plan to make my next version in fleece-backed sweatshirting for a real winter dress. I also have a great Ikat woven fabric that I think will look good with the cinched-in middle. A lovely pattern, and I look forward to making more!

Wednesday, 7 December 2016

A tale of three toiles, one of them wearable!

Hello Sewing buddies.  A little while ago I decided to try making some trousers. I have made elastic waist trousers in the past, and wear them happily; but, I wanted to try a pair of proper fitted high-waisted trews. Out came the old paint splattered bed-sheets - it was toile time!

Looks okay standing very still, but lots of extra fabric at the front.

This pattern is Simplicity K1699 and it's very straightforward: no pockets, no fly zip - so I could just focus on getting it to fit me!  Toile number one was baggy in the front crotch, as if my front rise was drastically shorter than the pattern.

After sewing this toile, I have noticed bagginess on many old RTW trousers that I'd never noticed before! This actually made me feel better; although I should try and get them to fit the best I can, I shouldn't get too hung up on being a perfectionist with fit, as most flaws we don't even notice day to day. That realisation gave me the confidence just to have a go with fitting.

The seam on the front is where I have taken out a triangular wedge of excess fabric.

For toile number two, I have pinched out the front excess on the crotch, and it fits me much better. I also added back to the top what height I'd pinched from the crotch curve, so that the front and back of the trousers were still level. At the back, I took a small slice out under the bum to get rid of the bagging.

I am really pleased with both of these adjustments, and was keen to next try out on fabric I could wear out of the house. I believe the test of a garment's fit is only complete once you've worn it all day.

Drag lines at the back- too much fabric.

Wearable toile number three is from some cheap jumbo cord. The material, although a nice colour, has a high acrylic content; it was, though, very cheap and has a similar weight to my fashion fabric. For this version, I kept the previous adjustments and tried to tackle the bagging at of the back just under the bum. For this, I created a new seam line on the back pattern pieces, losing a good inch on both sides but keeping the front pieces as they were.


I have taken them out for a spin. Conclusions: They are comfy. They hit my waist, which is how I like to wear my trousers. I could pinch a little more out of the front crotch, they are still a little baggy - although I only really see that in the photos and don't scrutinise my clothes that deeply in real life.

You can see in this photo that there is still too much fabric at the front crotch.

Whats next?  I am not sure. I have bought the most gorgeous wool/viscose blend in dark grey suiting from Ditto Fabrics to make my final version, but I feel I should get the fit better before cracking open the lovely fabric. I may have one more toile in me; perhaps I will play with adding the bib of a dungaree pattern on my next go, just to keep the project fun and appealing. Time will tell!

Even with a less than perfect fit, they are still perfectly wearable! Ha-Yah - take that fit issues!

What do you do when you have nice fabric you are aching to use?


Saturday, 19 November 2016

Being a Sewing Intern

Hi friends; today, I want to let you know what I've been up to recently. Since September, I have been working as a sewing Intern for Sew -in -Brighton


It came about following a chat to the lovely Kat Neeser, the owner, at the Summer Sewmance, and then another at the Brighton Sewcial.  Kat Frequently advertises for interns. but with the little kiddos around I had no way of doing it before. However, school started for my youngest in September; with all of them out of the house in the daytime, I grabbed my chance.

Having been a stay-at-home mum, raising my three lovelies, anyone who knows me will know that my confidence has plummeted during this time. I saw this internship as a way to boost my self-esteem, and get used to working and interacting with adults again! Whatever my reasons, though, I have to say I LOVE it.


All the students have such a nice time in class: it's a light and bright studio, and stitchers are so friendly (we all know that) with everyone chatting away happily. If you are in the Brighton and Hove area, and thinking about learning to sew - or wanting help with fit - I would really recommend the Sewing Lounge.


On a typical stitch class, I might show a student how to put in a zip, how to measure themselves to decide on pattern size, or how to "rub off" RTW clothes to make a dressmaking pattern. I didn't realise how much I knew about sewing until I started here! I found I am reasonably quick at threading an overlocker, and able to troubleshoot tension problems!

Here you can see a student is using her leggings as a template for a new pattern, She now needs to add seam allowance and notches and then will be ready to go.

The best bit about being an Intern is learning from Kat. At first, I would just watch when she helped students with fit issues, but I am gaining confidence in how alterations are achieved myself now. It's not just full bust adjustments, there is trouser fitting and shirts too. It's really fun.

This student has made a copy of a RTW child's dress out of an old dress of hers. Excellent refashioning.

Tissue fitting and doing flat pattern adjustments before cutting out in fabric.

In addition to the stitch classes, Sew-in-Brighton offer more structured courses, for example on Tailoring or Pattern cutting.  These sound really amazing.

I help out in the weekly stitch class in the morning, and in the afternoons I sew up samples for Kat or draft out patterns for students to use within the stitch classes. For example, I have made a pattern from an old oven glove!


It will then be made up to test the pattern to make sure it works before releasing it for students to try. This will hopefully be one of the patterns available on the Christmas present making class, alongside hot water bottle covers and lots of other perfect presents. Details here if you are interested.

After each session I come home so eager to sew for myself after what I've seen in class. So that is my latest news - I am enjoying feeling useful and having fun with sewing.

Tuesday, 8 November 2016

Vintage A-line

Hello sewing friends, I have recently bought some coloured tights. Which is a tenuous justification for needing a new skirt - or skirts plural - to go with them! Do you ever feel the need to have an excuse for your makes?


Here are a couple of short A-line shaped skirts I liked in the shops, two corduroy, one brushed velvet. I then went through my pattern stash to see if I had any likely candidates.


On these RTW skirts, I liked the fly zip or exposed zip the best. I also knew I had a deep plummy-purple denim (from Ditto fabrics) in the stash which would work well as an A-line. I found a great 1970s A-line pattern that I got in a charity shop eons ago, and thought would be perfect. It has a longer length, but I felt confident it would look just as good. I did actually lop off a good 5 and a half inches from the length of the pattern and it still hits my knee.


I've a considerably larger waist than the pattern's 24 inches. I enlarged it by slashing and spreading. I have no idea if this is the right way to do it, but it seemed an intuitive way to go. It's also worked out well.


All went swimmingly with the construction; amazingly, the fly zip was a doodle. However, I came unstuck at the waistband: my machine just did not want to sew through all those layers, and top-stitching was tedious and slow. I unpicked frequently, as the machine jammed and wobbled.


So, the top-stitching is not my finest sewing hour, but I am going to ignore it - not only can I not face unpicking it yet again, I have also over-trimmed, so I think this is the best it's going to look anyway. It would be churlish to spurn this skirt just because of the waistband, and most of my tops will hide the worst of its sins anyway. In hindsight, I should have used my Nan's 1970s Elna to top-stitch - remember next time, Lou of the Future!


I am very pleased with the skirt; adding those four inches to the waist has worked well, and this deep colour will go with all my new tights! I foresee a mini-skirt version of this in the not too distant future.


Lots of love sewing pals. Next time, I am going to tell you my exciting news about working as a sewing intern for the Sew-in Brighton Sewing school.

Lou xx

Monday, 24 October 2016

A little sewing for the whirla-girla!

Hi there! I am finding more motivation to sew recently. I'm so pleased, as it is good for my mental health and general happiness when I have a project on the go.

These two are little makes, but happy ones.  First up is a summer gingham uniform for the whirla- girla. I left it late to buy school uniform and they only had winter clothes in stock, but it was persistently, gorgeously hot in September. So, I thought I'd make her a summer dress uniform.


All of the other girls wear gingham at school, in many different hues of blue and differing styles; I felt a homemade one wouldn't be out of place.


The only issue with this is the lack of collar. I didn't want to buy a new pattern, as speed was of the essence, before the heat of the sun faded away, so I used a trusted pattern book: Sew Chic Kids.


I love this book, and would recommend it to anyone sewing for young children (2 - 8 years). Mainly aimed at girls, it does have a few shirt patterns, trousers and shorts too.


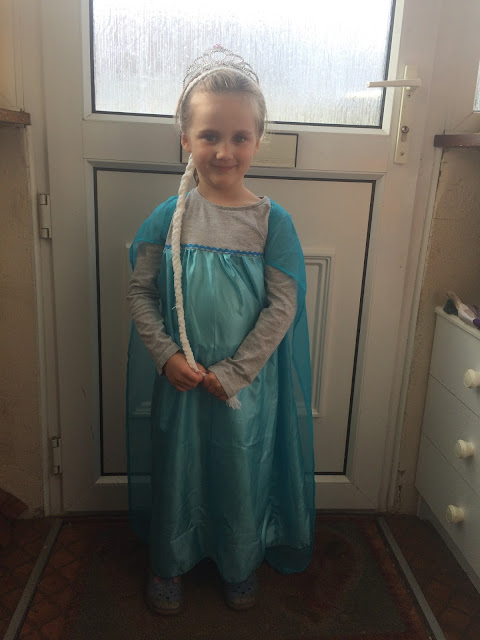
Secondly, I made the darling girl a quickie 'Frozen' costume. I'd picked up some floaty fabrics at the Brighton sewcial fabric swap table. They caught my eye, and practically shouted at me "ELSA CAPE". Sadly for the little one (though not for me) one of the fabrics proved to be silk after a quick burn test, and was deemed too good for dress up! In the end, her costume was made from a slightly too small grey t shirt, an acrylic blue scarf, and some cheapy lining fabric. 


She is happy and that is the main thing. I didn't follow a pattern, just made it up as I went along. It's a gathered rectangle of lining fabric sewn to the t-shirt, which I trimmed to just below the arms in length. I then sewed the scarf to the back neckline to create the cape, and added a bit of ric-rac as trim.


But the crowning glory is the Elsa hair! I had a small amount of acrylic yarn hanging about and I plaited this to create a hairband pony tail. I am tempted to redo this with a full ball of yarn as she loves it and it would look even better thicker. But that's for another day...


How is your sewjo now the nights are drawing in?

Saturday, 15 October 2016

The Keyhole Blouse, sans keyhole!

Sewing is looking up for me at the moment. My sewing room is tidy and inviting, and I am occasionally finding time to squeeze in bits of sewing for myself.


I got the Keyhole Blouse pattern free with Love Sewing magazine and loved the style. It felt very me, and I made it up quickly a couple of months ago with some very old stash fabric, you can see it here. Without a black cami underneath, though, it is a bit indecent due to the keyhole! This time I decided to get rid of the keyhole altogether.


I also added an extra 1.5cm all around to raise the height of the neckline. It now doesn't feel so exposing and is a good height for a statement necklace. Really happy with the result.

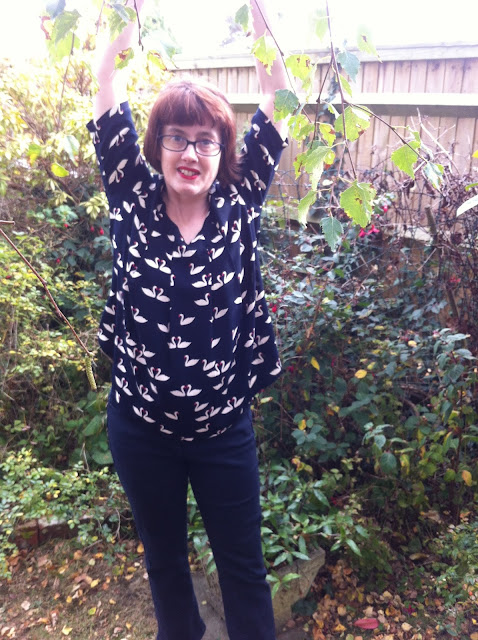
I started this make over the holidays, but it was quickly abandoned after forgetting to centre the swans when cutting out! But my lovely IG friends convinced me to carry on, and I am glad I did. It wasn't plain sailing even then: after setting the sleeves, it was straining at the back armscyle.
All fixed thankfully.

I should add that this was probably caused by me, as I did a small shoulder adjustment (the toile top was very big on the shoulders). I was therefore extremely grateful to two Instagram friends, Anne, aka "new_vintage_sewing", and "morrissews", who talked me through how to rescue my top. This basically involved removing the pleats from the back bodice. Now, it fits perfectly.

 Plenty of room now for movement.


The other difficult bit was trying to make bias binding with such fine slippy fabric. But I got around that by blasting my strips of bias with spray starch; they then folded and pressed neatly into shape.  I am glad - the binding is a nice feature of the blouse.


The fabric was bought from Fabricland over the summer holidays and is viscose, which is a fabric I love to wear.  My only concern is whether the feature pleats make me look like I am pregnant?


Even if it does, I shall wear it as I think it's really pretty. If I make another version, though, I think I may stick to style B without the pleats. I have a pretty floral poly crepe bought from TMOS that would make a nice version to wear out for Xmas drinks.

Tuesday, 27 September 2016

The Refashioners Challenge and The Stylish Dress book

Hi there.  After my last post about my flagging sewjo, I've made an effort to prioritise sewing.  Even if I could only sew every other day for 15 minutes at a time, I felt that was better than not at all.


As I have been making lots of silly mistakes over the Summer, I wanted a project that was easy skill-wise and very little financial risk. Enter Portia Lawrie's Refashioners challenge to create a new garment from jeans. I watched her series with interest, and thought the garments created were outstanding; but, I did feel  a lot of them were rather wasteful in the number of jeans used to create one garment - in some cases nine pairs were used!  Lots of fabric must have ended up in the bin, which I felt rather went against the spirit of refashioning.


I wanted to limit myself to using only one pair of jeans, and I was lucky enough to find a huge pair (size 42 waist) for just three pounds. I felt if I mucked it up, I'd only be wasting three quid and only one pair would end up in fabric recycle. So, worth a go.


As I didn't have the energy to spend hours on a new-to-me pattern or work out free-hand pattern making, I spent some time looking through patterns I have used before, and that were ready to go without alterations. I plumped for Dress D from The Stylish Dress Book. I have made it three times before; it's straightforward to make and I know the shape flatters me.


I unpicked rather than cut the seams, so I was lucky to be able to fit the pattern pieces on the legs. Unpicking also created these funky looking features at the side seams where fabric that was originally within the flat felled seams is now on show! I rather like the effect.


The other features I really like are the dark patches which were originally hidden beneath a pocket. I think having the different tones of blue looks fun.


In an attempt to use as much of the original jeans as possible I re-topstitched one of the pockets and also wanted to use the waistband as the hem - much to my delight it fitted perfectly, I added the little leather tab too, but I'm not sure if that isn't too much?


I am really pleased with this dress; it was a slow process, as I found it hard to motivate myself. I am so glad I did, though, as it feels wonderful to have made something I enjoy wearing. Did you take part in the challenge?  I'd love to see your makes.