Sunday, 22 December 2013

Immy's Christmas Dress

Notice I'm still not posting about the green velvet dress! Yes, I'm putting it off, it's still too painful.

So, instead - a refashion. Take one pillowcase and one vintage nightie pattern and what do you get...  Imogen's Christmas dress!


I loved making this.  A whole dress squeezed out of just one pillowcase.  It has raglan sleeves, and a gathered neckline finished with a self fabric band.  It's super cute.


Even though the pattern is actually for a nightdress, I'm so pleased with it that she can wear it out too.  I may make it again in a soft flannel, so that she actually gets a nightie too!
 

The back has a simple button closure, so it is easy on and off - necessary with a wriggly toddler.


At the hem, I added a length of lace just to make it a little more seasonal. 


Well, I think she is all ready to party now.  Merry Christmas everyone!

Sunday, 15 December 2013

Happy Homemade, Sew Chic Kids: Parka

This is a make from Happy Homemade, Sew Chic Kids by Ruriko Yamada.


What a book. I LOVE it.  I have two boys and a little girl and I can say hand on heart I want to make every single design; but, I had to start somewhere, so I started with pattern S, "Pull-over Parka".


It is so easy; really, really easy - only six instructions to follow.  I would recommend it as a pattern for beginners, as it gives you a great result with minimal effort. It is my quickest make to date.

I made age four for my four year old and it's a little roomy, but he will grow into it.


I've made it  from fleece, it is so cosy and warm.  I now need to make one for my big boy too!


He loves it too,  which is rather gratifying.  Well done Laurie on your modelling, very keen to be in Mummy's blog!

PS.  A thank you everyone for your advice on sewing up my velvet dress.  It was so appreciated.   I have finally finished it before it finished me!    Just need to photo it now. 

Saturday, 7 December 2013

Will I be beaten?

This project could be my undoing.  I brought some green crushed velvert from Fabricland in Brighton.  Or as my children refer to it "Happyland"!  I had the intention of whipping up something elegant to wear over the festive period.

I spent some fun time on pininterest looking for inspiration.  My board can be found here. .http://www.pinterest.com/louise0451/party-dress/


This was one of my favourites.

In the end I decided on a mini-length dirndle style dress with short sleeves. I have Wendy Mullins book Built by Wendy - Dresses  which allows you to use her basic patterns to design your own clothes.  Sorted. Or so I thought.

I cut out my pattern pieces, started to pin my pieces together and then ...PANIC... it suddenly struck me, I had no idea how to sew with stretch fabric.

Easily fixed - I can practise on the scraps left after cutting out.  But I can't do it!  The tensions all wrong, the seams won't hold.  I tried again the next day, hoping it was just because I was too tired.  Same again.  I've tried using a walking foot to stop the fabric moving around, but I still couldn't get the tension right.  Anyway, this is the first thing I've tried to sew since I took up this hobby that I haven't enjoyed.  I'm feeling beaten. Bah.

Not sure what to do now.  Give up? Keep going?  Buy a party dress for Xmas?  Do same pattern with non- stretch fabric?  Or I may sew something else, then come back to it.  I need a sewing "high"!

Sunday, 1 December 2013

My 1960s dress

This project is my first foray onto the world of vintage patterns.  And I loved it!  Just holding the pattern pieces and picture card made me feel like the curator of a museum.


Economy Design No 233.  I'd never heard of this company before.  It must have been a mail order company, as the design came in a brown return envelope rather than a normal pattern sheath.  All the pieces were there, though sadly no instructions.  So I winged it, and made it up as I went along.

Rather elegant!  I even wore my heels for the photos!  Though I changed to boots for the rest of the day and felt that acually it looked okay dressed down too.

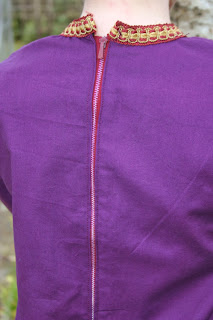
I added braid to accentute the 60s neckline and because it toned well with the purple.  The fabric is just a simple and very cheap cotton drill.  I didn't want to waste money on it, in case I fluffed the dress without instructions.


Heaven knows if I've done it right.  Sewing the yoke on was a leap of faith. So I just matched up the notches and hoped for the best.


 Maybe I should top stitch either side of this seam to make it stand out some more.


This was my first attempt at a zip!  It's not great but it's in and works.  Got to start somewhere.  Looking at the photo I'm going to add a hook and eye to the top.


So that's my first go at vintage. and it won't be my last.  It was fun.  I wore the dress out last week and found it made me walk tall.  Which is fabulous when you're 5ft nothing!

Friday, 22 November 2013

Sweet Dress Book: Dress C

A quick dress with lovely pleats.


This is dress C from The Sweet Dress Book by Yoshiko Tsukiori.  Oh so quick to cut out and sew, done in an evering, then hemmed the next day.  How I hate hemming - it is just not fun, it's fiddly and it's boring.  But must be done, I suppose.


Talking of hems - that looks wonky! It is just the way I am standing, honest.

This is an easy dress to wear it is light and layers well. I'm going to make it again and with a big pattern fabric, as used in the book.   Sadly it does not seem to photograph well.  I think that could be the pattern of the fabric, which is actually rather pretty flowers in a nut brown and black - perfect for Autumn.


Photographs come courtesy of a very, very bored seven year old boy. My four year old wants to take the pictures for the next post.  So, there might be a lot of out-of-focus shoes and walls in that one!

Saturday, 16 November 2013

Make do and mend

My newly acquired sewing skills have found a use. Immy (my darling daughter) has way out-grown a cherished dress; but, rather than consign it to the charity shop, I've taken a leaf out of the grandmother's book, and employed the skills of make do and mend.


Essentially,  all I did was chop off the tiny bodice...


...then, all I needed to do was cut out a bigger bodice shape from toning fabric.


Finally,  I sewed the new bodice onto the skirt.  Obviously, Immy likes to carefully supervise and make sure I'm doing things right.


Ta da! A new, bigger, dress.  Finished with bias binding to tie it all together, and a little fabric flower.


Ironically, it is now a little too big for her! But only slightly.  I feel really chuffed to have given it a new lease of life.  They out-grow things so quickly, and this was a good way to give a nice dress a longer life span. Very easy and very quick to sew.


And (although I'm biased) rather wonderfully modelled by my little girl.

Sunday, 10 November 2013

The Stylish Dress Book Vol. 3 Design A

Oh no.... I don't like it!  


I worked really hard on it: it is finished with beautiful French seams; it has lovely pleated tucks, and floaty sleeves.


The trouble is it just doesn't feel right; the sleeves look silly on me, like I'm wearing dress up clothes.


As I see it I have three options:

1. Unpick the floaty sleeves
2. Cut it up and use the fabric for something else.
3. Charity shop it.


Am I sad or disheartened... no, not a bit.  I really enjoyed making it. And my husband likes it.  Actually, make that 4 options:

4. Make matching trousers and wear them as PJs in bed, that way the hard work won't be wasted.  Now there's an idea.

NB: this post's photographs were taken by my 7-year-old son!

Sunday, 3 November 2013

Making This More Me

I spend a lot of time reading sewing blogs.  I love the advice, the inspiration, but best of all I love the pictures.  Some bloggers' photography and staging is exquisite.


This is from http://www.nobigdill.com/2013/10/project-sewn-sew-all-26-e.html - a beautifully styled blog which I can spend hours reading. Another stunning blog is http://buttonsandbirdcages.com


The photos are like those you'd expect to see in a glossy magazine.
 
Why am I mentioning these blogs?  Because, although I find them inspirational and I certainly won't stop reading them, they are not my style.  I don't mean that the clothes aren't my style, but the lifestyle bears no relation to my life.

That got me thinking: does my blog represent my style, and me?

My strapline mentions the things that get in the way of my sewing and I haven't mentioned this until now.  My wonderful children don't mean to get in the way of my sewing... they just do.

My tin of sewing threads is often full to the brim with Lego. My pin cushion is constantly being stolen.  And this is what my sewing space looks like three times a day:


Not a photo you'd expect see in a glossy magazine!

I literally have to scrub my the table within an inch of its life each time I want to sew!  But it doesn't stop me wanting to sew.  In fact it spurs me on even more.  I LOVE sewing, at the moment it feels like an addiction: each make is the next hit, and no sooner is one item complete than the next is being planned, cut out, sewn.

I digress. Over the next few weeks I'm going to try and find my style within my blog.  Find a way to show what sewing means to me.  Well, that's the plan - whether you'll be able to see any difference remains to be seen!

Friday, 1 November 2013

An easy win

A quick and easy refashion of a dress that just didn’t suit me.


It had a fake wrap top which gaped and flashed far too much.  But the pattern was nice...


... and the fabric floaty.  I figured it would be really easy to turn from a dress to a skirt and I was right.


The waist was already gathered with shirring; so, all I needed to do was cut off the bodice and neaten the raw edges.


I used black bias binding to finish the edge.  It was a little tricky holding the fabric taut, as it naturally wanted to gather as I sewed.  But I think this was just my inexperience in sewing showing.


Quick, fun, and I now have a floaty skirt.


Easy to wear too.


Sunday, 27 October 2013

Stylish Dress Book: Design F Jacket.

Oh my word! This is the make of which I am most proud, so far: stress free, straightforward and no sewing disasters.

Huge compliment… my husband likes it.  Though he thinks it’s like something “Mary Berry might wear”!!! Is that bit still complimentary?


The fabric, as per usual, is leftover from my Nan’s stash.  This started life as rather faded curtains and I had to fiddle around with pattern placement to make sure all the fabric was the same colour!  I have more of this fabric left that has been sun faded to a very light turquoise, which I might use at a later date.


The pattern is from Stylish Dress Book (Clothing for Everyday Wear) by Yoshiko Tsukiori.  The instructions are excellent, and provide an easy to see tick list to check you’ve done
 everything and in the right order.


Again, cute little pockets - I’m becoming a real pocket lover!

 
One make later, we have a great jacket and a happy stitcher… now, what next?

Wednesday, 23 October 2013

Breast Cancer Awareness - Pimp Your Bra!

I had a lovely evening last week surrounded by glitter, sequins, feathers and silk flowers.


The idea was to create a burlesque brassiere, whilst raising money for Breast Cancer Awareness.  I hand stitched tiny little pink flower sequins and a silk flower too.


Then, I added some ribbon for good measure.


This was my first go at hand stitching embellishment and it was really relaxing.  I had a lovely time and my bra looks fab.


These two were made by friends:


A great time was had, and all in a good cause.

The evening was organised by the lovely Julia at JuliaArts.